Loading Table of Contents...
How to Design a Simple, SEO-Friendly Online Store
Learn how to design an online store, from site structure, UX/UI, product pages, and payments to SEO, platform selection, and prelaunch testing.
Designing an online store involves defining goals, planning the product catalog and site structure, designing the user experience and interface, developing shopping features, integrating payments and shipping, optimizing SEO, setting up analytics, and testing before launch.
In this guide, Connect Tech walks through a practical process for designing an online store: choosing software, creating a sitemap, designing product pages, and setting up the cart, checkout, payments, shipping, and SEO.
How to Build an Online Store With WordPress, Shopify, and Canva
WordPress, Shopify, and Canva offer different ways to create a sales website. Choose a tool based on your goals and the amount of customization you need.
|
|
|
|
|
|
|
|
|
|
|
|
|
|
|
|
|
|
|
|
|
|
|
|
|
|
|
|
|
|
|
|
|
|
|
|
|
|
|
|
|
|
|
|
|
|
|
|
|
|
Designing an Online Store With WordPress
WordPress combined with WooCommerce allows businesses to build online stores with extensive control over design, content, products, and features. WooCommerce supplies core e-commerce components such as products, categories, a cart, checkout, orders, and inventory management. WordPress serves as the CMS for the rest of the site.
A typical WordPress online store project includes these steps:
- Prepare a domain and hosting: Register a domain, choose hosting suited to expected traffic, and set up SSL so the site uses HTTPS.
- Install WordPress: Set up the CMS, language, permalinks, administrator accounts, and basic settings.
- Install WooCommerce: Configure store details, currency, sales regions, taxes, and necessary e-commerce options.
- Choose and customize a theme: Select a design suited to the product category, then adjust the logo, colors, typography, menus, banners, and key sections.
- Build the product catalog: Create categories, products, attributes, variations, SKUs, prices, sale prices, images, and stock information.
- Set up the cart and checkout: Check how customers add products, change quantities, enter shipping details, and complete orders.
- Integrate payments and shipping: Connect payment methods and configure shipping fees or delivery options appropriate to the market.
- Configure SEO and analytics: Optimize URLs, titles, meta descriptions, sitemaps, and structured data, and connect analytics tools.
- Test before launch: Check products, the cart, checkout, payments, order emails, responsive layouts, speed, and indexability.
WooCommerce suits businesses that want strong control over their website, especially when they need to add features or connect other systems. Plugins, themes, and custom code can extend the platform to support processes beyond its default setup.
WordPress also requires ongoing attention to hosting, WordPress and plugin updates, themes, backups, and security. Installing too many plugins or using a poorly optimized theme can cause conflicts and affect speed and user experience.
WordPress + WooCommerce is a good fit when:
- You need deep control over the interface and content.
- Your business wants to choose its own hosting and technical setup.
- The site needs a strong content SEO strategy and flexible content structure.
- You need to integrate a CRM, ERP, POS, API, or internal system.
- Sales processes may become more complex over time.

Designing an Online Store With Shopify
Shopify is a SaaS e-commerce platform that provides much of the infrastructure needed to run an online store. Instead of installing a CMS or managing a server as in a traditional WordPress setup, users can focus on products, design, payments, shipping, and sales.
A typical Shopify store setup includes:
- Create a Shopify store: Sign up, choose a store name, and enter company details, currency, and target markets.
- Choose a theme: Select one that fits your products, then customize the logo, colors, typography, header, footer, homepage, and sections.
- Add products: Enter names, descriptions, images, prices, SKUs, stock levels, attributes, and variants.
- Create collections: Group products so customers can browse easily and the site has a clear navigation structure.
- Set up navigation: Build the main menu, category menus, footer, and links that help customers find products.
- Configure payments: Set up payment methods available in your target market and test the payment process.
- Set up shipping: Define delivery regions, charges, shipping rates, and suitable delivery options.
- Connect a domain: Use your own domain instead of the default Shopify address to build a professional brand presence.
- Install necessary apps: Add tools for marketing, reviews, email, loyalty, shipping, analytics, or specialized workflows.
- Test and launch: Check products, checkout, payments, emails, mobile layouts, speed, and key pages before opening the store.
Shopify suits businesses that want to shorten their e-commerce launch time. Many essential store features are already available, so users can start with a theme and add apps as needs grow.
One consideration is that Shopify is a SaaS platform, so its system-level control differs from a site where you manage all the source code and infrastructure. Specialized operations may require apps, custom development, or separate integrations.
Shopify is a good fit when:
- Your business wants to launch e-commerce relatively quickly.
- Your team does not want to manage servers and most technical infrastructure.
- The website centers on sales and store operations.
- You need an e-commerce app ecosystem to add features.
- Your product, checkout, and order processes are fairly standard.

Designing a Sales Website With Canva
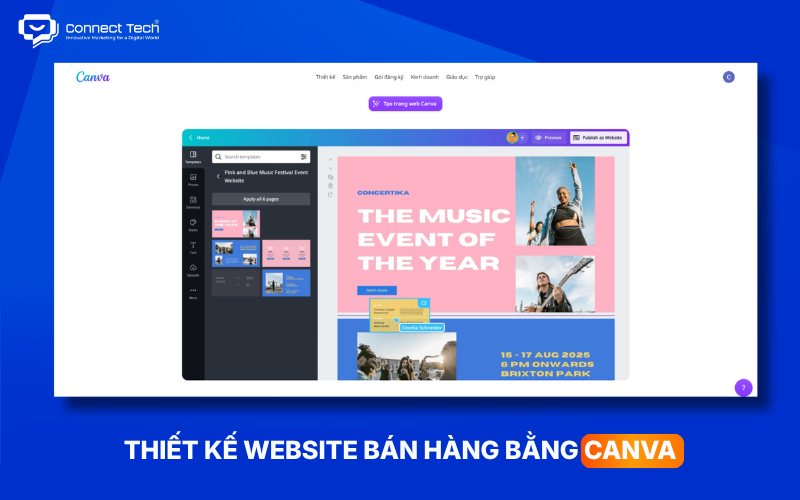
Canva offers a visual approach: start with a template and adjust the layout, images, colors, typography, and content without coding. It is especially useful for quickly creating a product showcase, landing page, or interface prototype.
You can design a site in Canva through these steps:
- Choose a website template: Find one that suits your category or start with a blank design.
- Plan the layout: Arrange sections such as the hero, product introduction, benefits, images, testimonials, CTA, and contact details.
- Apply your brand identity: Add your logo, brand colors, typography, and product images.
- Design CTAs: Add buttons such as “Buy Now,” “View Products,” or “Contact Us,” or link to a selling platform.
- Check responsive layouts: Review how the layout appears at different screen sizes before publishing.
- Publish the website: Publish the design using a domain or publishing option supported for that type of Canva website.
Canva is better suited to simple sites, landing pages, or prototyping than to an e-commerce system with complex operations. It lets users visualize a design before handing it to a developer to build as a full website.
If a store needs to manage thousands of products, multiple variants, inventory, carts, checkout, payments, shipping, a CRM, or an ERP, Canva should not be its main e-commerce platform. In that case, use Canva for visual assets or prototypes and build the store on a suitable e-commerce platform.
Canva is a good fit when:
- You need a simple sales landing page.
- You want a prototype before developing a website.
- You do not know how to code.
- The site has few products and a simple purchasing process.
- You want to create a visual design quickly to test an idea.
10 Simple Steps to Design an Online Store for Beginners
1. Define Goals and Requirements Before Designing
Setting goals keeps the website on track and reduces changes during development. Before starting, identify your products, customers, sales model, and essential features.
Basic requirements may include:
- Product categories and the number of products.
- Variants such as color, size, or volume.
- Cart and checkout.
- Shipping methods.
- Order and inventory management.
- Promotions and discount codes.
- CRM, ERP, POS, or marketplace connections if needed.
Define your needs before choosing a design or platform. The tool should support the business model.

2. Plan the Site Structure and Product Categories
A clear site structure helps customers find products and search engines understand how the pages relate to one another.
A basic online store might follow this path:
Homepage → Category → Product → Cart → Checkout → Order
Depending on the business, you can add brand, blog, About Us, Contact, FAQ, policy, and customer account pages.
Organize categories around the way customers search for and choose products. Standardize product names, SKUs, prices, images, descriptions, attributes, variants, and stock data.
Navigation, breadcrumbs, internal links, and search help users move between pages and find products faster.
3. Design the Store's UX/UI
UX/UI design presents products clearly and guides customers from browsing to buying.
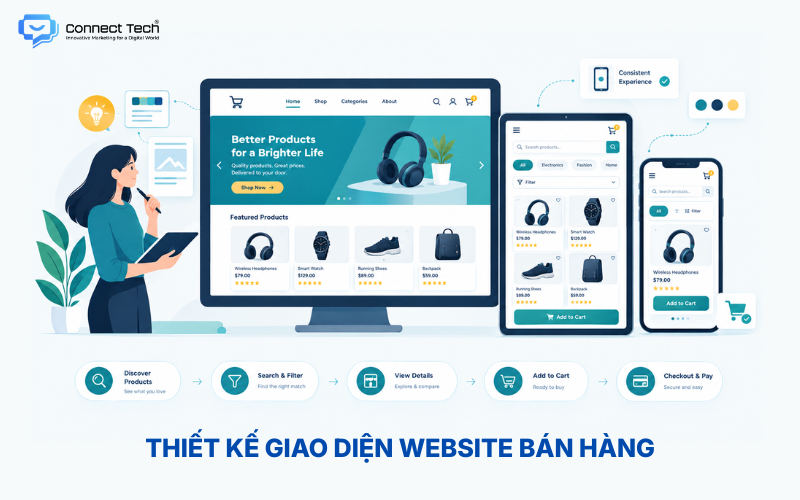
The homepage should quickly show what the business sells, highlight products, and make the primary customer action clear. Category pages should make it easy to view, filter, and sort products.
The site also needs responsive design so it works on desktop, tablet, and mobile. For e-commerce, pay particular attention to menus, search, filters, product galleries, and CTAs on small screens.
4. Design Product Pages That Help Customers Buy
A product page should provide enough information for customers to understand the item and make a purchase decision.
A basic product page should include:
- Product name and images.
- Price and promotions.
- Description and specifications.
- Variants such as color, size, or volume.
- Stock status.
- An Add to Cart or Buy Now button.
- Shipping, returns, and warranty information.
- Reviews or other trust signals.
Images and videos should let customers view the product from several angles. Related products and cross-sells can introduce other relevant items.
5. Design the Cart and Checkout Flow
The shopping cart and checkout should make it easy to complete an order without unnecessary steps.
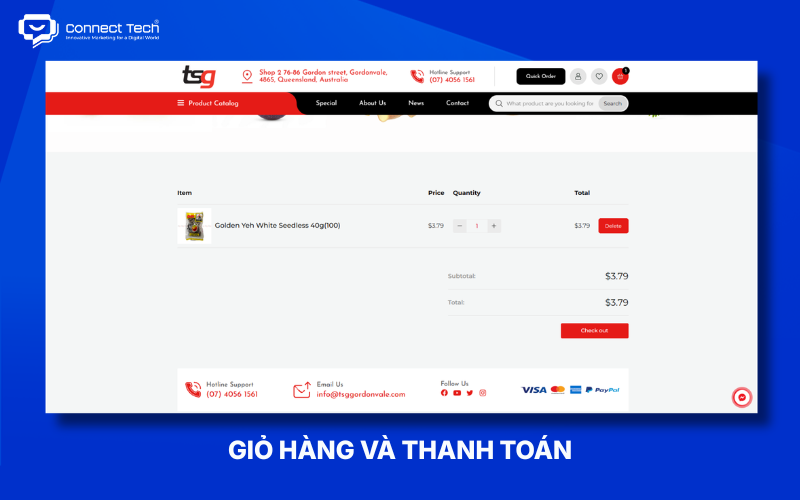
The cart should clearly show products, quantities, prices, shipping charges, discount codes, and the total. Checkout should focus on essential details: recipient, address, delivery method, and payment method.
Offer guest checkout if it suits your business model, and optimize forms for mobile. Before confirmation, customers should see their full order, all charges, and the total payable.
6. Integrate Payments, Shipping, and Order Management
Connect payments, shipping, and order management so that an online purchase becomes a workable business process.
Depending on the market, a site may offer cash on delivery, bank transfers, QR payments, digital wallets, or cards. Shipping settings should define delivery areas, charges, estimated times, and tracking.
If the business sells across several channels, the site can connect to a CRM, ERP, POS, or marketplace to synchronize products, customers, inventory, and orders.
7. Plan SEO From the Start
Build SEO into the site structure so search engines can discover and understand product content.
Set clear URLs, logical category and product hierarchies, breadcrumbs, and internal links between related pages. Optimize category and product pages with appropriate titles, meta descriptions, H1s, content, and images.
An online store can use product structured data and product variant information to give search engines more details. Google Merchant Center can also bring product data into Google's ecosystem.
8. Optimize Speed, Mobile Experience, and Security
An online store needs to load quickly, work well on mobile, and protect user data.
Optimize image sizes, use suitable image formats, remove unnecessary scripts, and use caching or a CDN when appropriate. Core Web Vitals can help track loading and interaction quality.
The site should also use HTTPS, protect administrator accounts, assign appropriate user permissions, and back up data regularly.
9. Choose the Right Platform and Technology
Choose a platform based on product count, complexity, budget, customization, and integration needs.
- WordPress + WooCommerce: Suits businesses that need a CMS, SEO capabilities, and flexible growth.
- Shopify: Suits businesses that want a quick e-commerce launch with less infrastructure management.
- Laravel, Next.js, or a custom website: Suits businesses with specialized processes or multiple system integrations.
- Template: Suits a simple site that needs to launch quickly.
- Custom design: Suits businesses needing a distinct interface or sales process.
Do not choose a technology solely because it is popular. The right platform should meet your current needs and support your business as it grows.
10. Test the Website Before Selling
Testing catches problems before customers make real purchases.
Test the entire buying journey: Product → Cart → Checkout → Payment → Order Confirmation. Check the website on mobile, desktop, and common browsers.
Before launch, also check:
- Do links and menus work correctly?
- Are products, prices, and stock levels accurate?
- Do payments and shipping work?
- Are there display problems on mobile?
- Can search engines index the sitemap, robots.txt configuration, and important pages as intended?
- Does tracking record view_item, add_to_cart, begin_checkout, and purchase events?
Once these steps are complete, you can launch the site and continue improving it using actual customer data.
An effective online store begins with business goals and continues with measurement and improvement after launch. Plan your product catalog and site structure first, then design UX/UI, product pages, the cart, checkout, payments, shipping, and SEO as parts of a complete sales system.
A business that focuses only on visual design may end up with an attractive site where products are hard to find, orders are difficult to place, or order management is cumbersome. A site that brings together UX, e-commerce, SEO, technology, and data can offer a stronger foundation for long-term sales.
For projects combining website design, e-commerce development, SEO, and system integrations, Connect Tech can build a tailored solution based on a business's scale and operating needs.
To pick up a draggable item, press the space bar. While dragging, use the arrow keys to move the item. Press space again to drop the item in its new position, or press escape to cancel.
Table of Contents
Related news

How to Design a WordPress Website: A Simple Guide for Beginners
Learn how to design a WordPress website in eight steps, from domain, hosting, layout and content to SEO and ongoing maintenance.

How to Design a Simple, SEO-Friendly Online Store
Learn how to design an online store, from site structure, UX/UI, product pages, and payments to SEO, platform selection, and prelaunch testing.

60 Website Design Terms Explained Simply for Beginners
Learn 60 website terms, from domains, hosting, UI/UX, frontend, and backend to SEO, security, and technology, with simple explanations for beginners.

Top 9 Easy-to-Use Website Builders That Require No Coding
Explore popular website builders, including WordPress, Wix, Webflow, Framer, and Shopify. Compare features and choose the right tool for your needs.

Top 9 Reputable Website Design Companies in Ho Chi Minh City
Compare nine reputable website design companies in Ho Chi Minh City by their strengths, services, technologies, and suitability to find the right web design partner.

Professional SEO-Optimized E-commerce Website Design
Professional SEO-optimized e-commerce website design with an optimized user experience, payment, order management, and operations. Full-service e-commerce website design tailored to your needs.